Category Archives: Network

UniFi Network Server on QNAP NAS

This Post describes, how to install the UniFi Network Server as Docker image on a QNAP NAS.

The first step is to make sure you’ve installed Container Station from the QNAP App Center.
After this, open Container Station, go to “Applications” and click “Create”.
Give your application a name, for example “unifi-and-mongodb”.
Upload this yaml-code for docker-compose, replace “UNIFIPASSWORD” with a secure password, you will use this later to configure the database:

Continue reading UniFi Network Server on QNAP NAS

Siterwell Rauchmelder GS559 und Gateway GS188 mit FamilyWell App

Ich hab mir vor langer Zeit mal bei einer Aktion unserer Gebäudeversicherung ein Set aus 3 Siterwell Brandmeldern und 1 Gateway bestellt. Die App hab ich mal heruntergeladen, die Bewertungen von iOS und Android App stimmten mich aber nicht gerade zuversichtlich. Die AGB’s sind unverständlich, die Übersetzung in Deutsch allgemein ziemlich wirr und die After-Sales Telefonnummer ist aus China. Weiter sehe ich nirgends wie ich den Account wieder löschen könnte.

Trotzdem habe ich mir heute mal einen Abend Zeit genommen, um mindestens einmal das Gateway mit einem der drei Brandmeldern in Betrieb zu nehmen. Dazu hab ich mir ein Test-WLAN erstellt, an welchem ich die FamilyWell-App mit dem Gateway verbunden habe.

Ein Mitschnitt der Registration sowie des Login-Vorgangs zeigt, was zu befürchten war: Der Login ist unverschlüsselt über http, die Zugangsdaten in Klartext lesbar. Den Benutzernamen hab ich mal unkenntlich gemacht, das Passwort könnt Ihr lesen:

Lustigerweise ist nach dem Login jeglicher Verkehr mit den chinesischen Servern verschlüsselt über https, was aber nicht viel bringt wenn der Loginvorgang mitgelesen werden kann. Dies bezieht sich jedoch nur auf die App. Was ich vom Gateway mitschneiden konnte, war unverschlüsselte Kommunikation mit einer JSON-API.

Dass mit der App noch weitere Sensoren und sogar Kameras verbunden werden könnten, macht das Ganze nicht besser.

Mal schauen ob ich in Zukunft noch mehr Zeit/Lust habe weiter zu grübeln. Jedenfalls kommt das Gateway und die App so bei mir nicht zum Einsatz.

Inspect SSL/TLS Traffic from Chrome/Firefox/curl with Wireshark (no mitm!)

Note 12.01.2020: Updated instructions and printscreens for Wireshark v3.0.

Firefox, Chrome and curl offer the possibility to save the session-keys for https connections. Just set the environment variable “SSLKEYLOGFILE” to a file where you want to store the keys. We do not need to start a man in the middle (mitm) proxy.

Example for MAC OS, execute this in the Terminal:

export SSLKEYLOGFILE=/Users/username/Documents/sslkeylog.log

Then start your Browser (Chrome, Firefox) or curl from the same Terminal-Session.

open -n /Applications/Firefox.app

Now start Wireshark, and go to “Preferences” -> “Protocols” and choose “SSL”. Set the Path to your keylog-file. This tells wireshark to read the Keylog-File for decrypting the captured traffic.

[NOTE:] Since Wireshark 3.0, the TLS dissector has been renamed from SSL to TLS.WIreshark TLS Settings

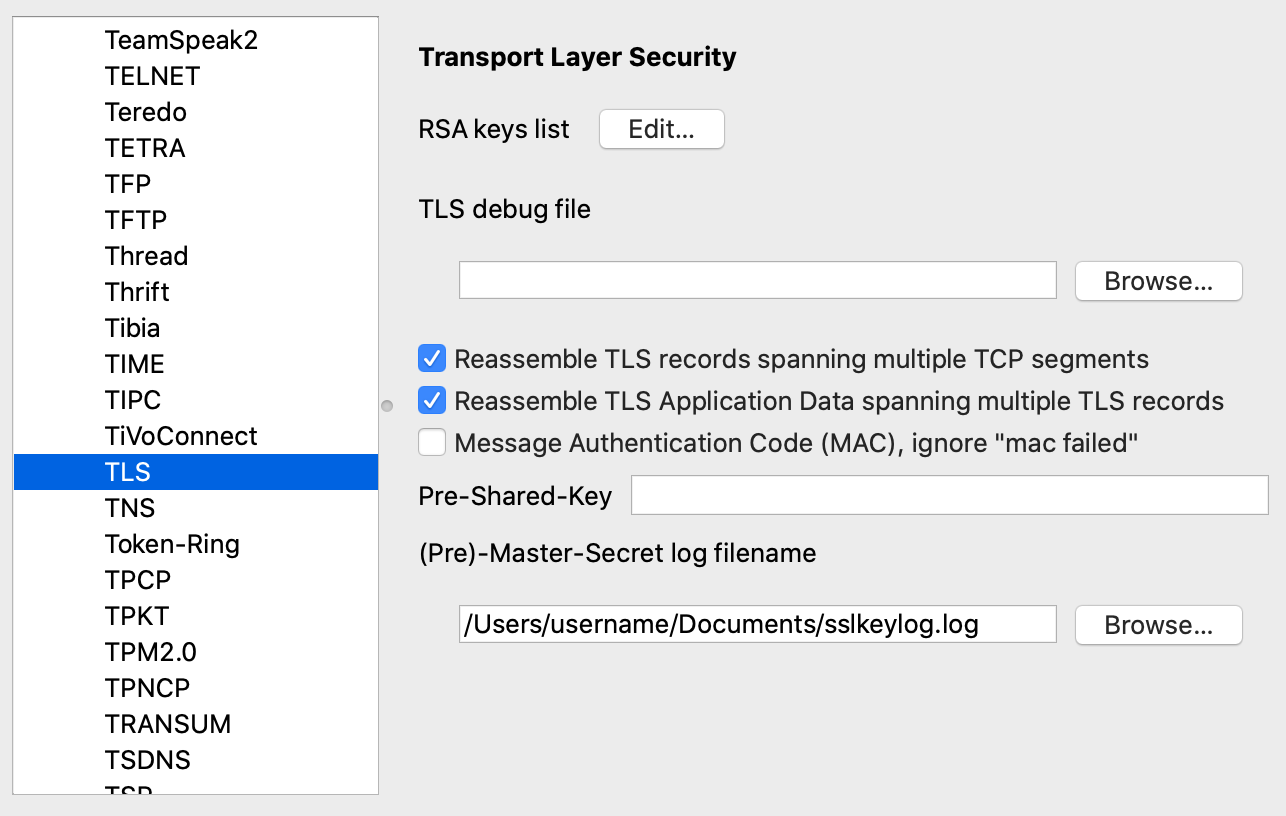
The following TCP protocol preferences are also required to enable TLS decryption:
– Allow subdissector to reassemble TCP streams. Enabled by default.
– Reassemble out-of-order segments (since Wireshark 3.0, disabled by default).

Now start capturing and see the decrypted traffic. Easy hm?

Wireshark TLS decrypted

I made me a script which sets the variable, opens Firefox and Wireshark:

#!/bin/bash
export SSLKEYLOGFILE=/Users/username/Documents/sslkeylog.log 
open -n /Applications/Firefox.app
open -n /Applications/Wireshark.app

This works the same way on Windows and Linux. On Windows you need the SET command or create a new environment variable in “Control Panel” -> “System” -> “Advanced System Settings” -> “Environment Variables”. Create a new one with name “SSLKEYLOGFILE” and the path to your logfile as value.

Links:
https://wiki.wireshark.org/TLS

Windows Device Manager: Show hidden devices

Sometimes there is a problem especially when switching network cards in virtual machines, that the old card remains hidden with it’s ip-config. If you want to configure a new device with the same IP-Address, you will get a warning that this IP-Address is already used on another interface. Of course you can’t delete the configured IP-Address, because the old device is not available anymore and somewhere hidden.

Now you can try to fiddle in the registry, but there is a clean way:

Start a command prompt as Admininstrator and then enter:

set devmgr_show_nonpresent_devices=1
start devmgmt.msc

Now you have to enable “Show hidden devices” in the menu of Device Manager and tadaaa, you see all devices which are not existing anymore. If you do not see the devices, make sure you start devmgmt.msc from the same cmd window where you set the devmgr_show_nonpresent_devices variable.

You can now remove the unused devices.

This setting is not permanent and stays only within this command line session.

vCenter Server behind NAT

Be warned: This configuration is not officially supported by VMware.

If you have your vCenter Server behind NAT, you can not connect your ESXi Host to this Server. It will loose connection after a few seconds to vCenter because vCenter publishes his private IP to the configuration of ESXi.

1. We need an port forwarding of port TCP/UDP 902 from your public IP to the internal IP of the vCenter Server. If you have a Firewall, allow connections only from the IP of your ESXi host.

2. Connect over SSH to the ESXi Host and edit vpxa.cfg with vi:

vi /etc/vmware/vpxa/vpxa.cfg

Configure the following settings:

Insert this tag, if you don’t add this tag and restart the services, it will overwrite the IP again with the private one of vCenter:

<preserveServerIp>true</preserveServerIp>

Replace the private IP of the vCenter Server with the public one:

<serverIp>PublicIPvCenterServer</serverIp>

Restart services:

/etc/init.d/hostd restart

Now the connection should stay stable.