Category Archives: General

Intex SX1500 to Home Assistant

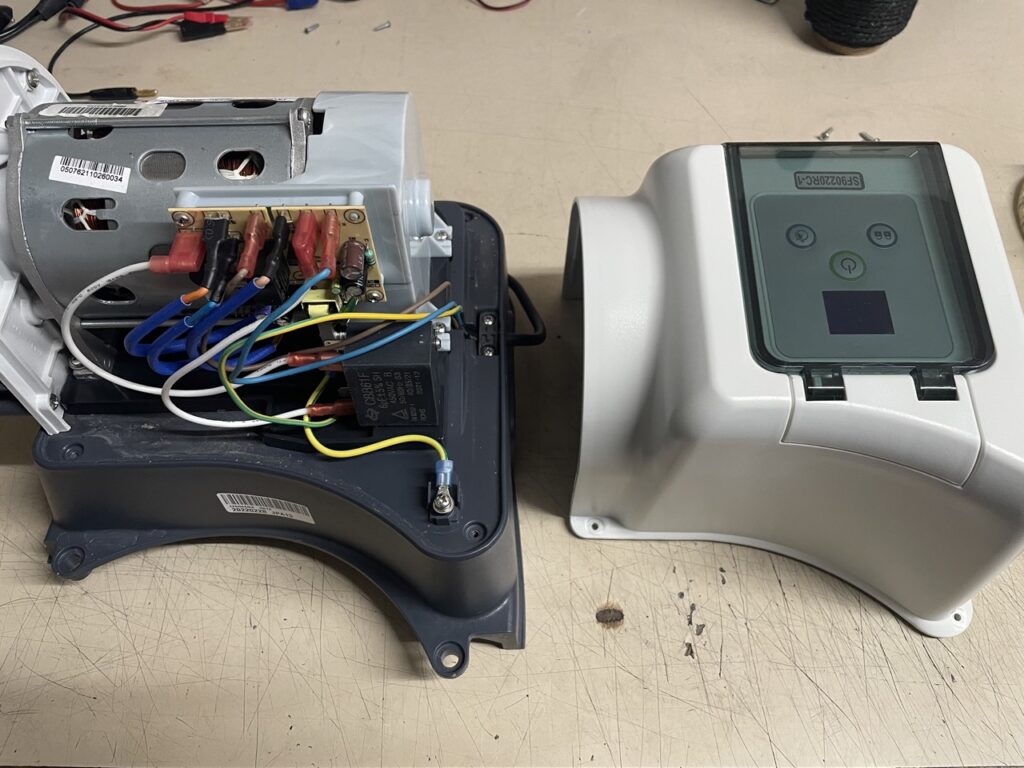
Because of the “dumb” automatic timer in the Intex SX1500 sand filter pump, I added a Shelly 2.5 Switch and integrated it in my Home Assistant. With this setup, I am more flexible with different timeplans and I even see the power consumption of the Pump.

This needs first a modification of the Pump.
Disclaimer: I am not responsible for any damage or injuries. Do this at your own risk and only if you know what you are doing. Always unplug any power mains before work.

Disconnect the mains plug! Remove the white cover and unplug the cable from the operating panel.

Continue reading Intex SX1500 to Home Assistant

VMware vCenter: SCP Backup does not work

Recently we changed the backup Server for our vCenter. The backup job over SCP worked for years on the old Server, but on the new one I was not able to configure the backup-schedule. I got always a timeout on the vCenter Server Appliance Management Web-GUI and I had to restart it with:

service-control --restart applmgmt

To get it working again without rebooting the whole vCenter Appliance.

After a few hours of debugging, I saw a process named sshpass which was hanging.
sshpass tries to find “Password:” in the prompt and sends then the password.

Now the problem was, the old Server had a prompt like:

Password:

And the new one had:

Password for username@servername:

So sshpass was not able to find “Password:” and timed out.

As both our servers are BSD, I had to fix the sshd config on the new Server for PAM in /etc/pam.d/sshd with adding of “authtok_prompt=Password:” and then restart sshd.

#auth required pam_unix.so no_warn try_first_pass
auth required pam_unix.so no_warn try_first_pass authtok_prompt=Password:

With this setting, the prompt changes from “Password for ….” to “Password:”.
And the backup-schedule works again 🙂

UDM-Pro mit public IP-Range

Die UniFi Dream Machine Pro von Ubiquiti ist an und für sich ein schönes Gerät, will man damit aber etwas professioneller unterwegs sein, zB mit einer public IP-Range ohne NAT, so wirkt die Firmware noch unausgereift und man muss derzeit noch zu Tricks greifen.

Folgend die Notizen wie man NAT deaktivieren kann, getestet mit Firmware 1.8.5.

VORSICHT: Nachdem NAT deaktiviert wurde, steht euer PC öffentlich im WAN! Tut folgendes nur wenn Ihr wisst was Ihr macht.

Als erstes erstellen wir ein VLAN mit der ersten public-IP die wir via PPPoE erhalten. Dies kann noch über das WEB-GUI gemacht werden. Nach Lust und Laune kann hier auch noch ein DHCP-Server eingerichtet werden.

Nun verbinden wir via SSH auf die UDM-Pro und starten eine Shell:

ssh root@<ip-adresse der UDM-Pro>
# unifi-os shell

Und laden ein Paket welches uns erlaubt, ein Script persistent zu speichern nach dem Reboot der UDM-Pro auszuführen (evtl. auf neue Version prüfen):

root@ubnt:/# curl -L https://raw.githubusercontent.com/boostchicken/udm-utilities/master/on-boot-script/packages/udm-boot_1.0.2_all.deb -o udm-boot_1.0.2_all.deb
root@ubnt:/# dpkg -i udm-boot_1.0.2_all.deb
root@ubnt:/# exit

Danch kontrollieren welches unsere Firewall-Regel ist welche NAT macht:

# xtables-multi iptables -t nat -L UBIOS_POSTROUTING_USER_HOOK -v --line-number
 Chain UBIOS_POSTROUTING_USER_HOOK (1 references)
 num   pkts bytes target     prot opt in     out     source               destination         
 1     1873  154K MASQUERADE  all  --  any    ppp0    anywhere             anywhere             /* 00000001095216660481 / 2        1   264 MASQUERADE  all  --  any    eth9    anywhere             anywhere             / 00000001095216660482 */

In meinem Fall ist es die erste Regel mit dem out-interface ppp0.
Diese müssen wir nun löschen mit einem Script, welches auch nach einem Reboot die NAT-Regel wieder entfernt. Zuerst erstellen wir das File:

cd /mnt/data/on_boot.d/
vi disable_nat.sh

Dann brauchen wir folgenden Inhalt der die Regel löscht. Falls es bei euch eine andere Regel-Nr. ist, einfach die Zahl am Ende anpassen. Bei mir ist es Regel Nr. 1:

#!/bin/sh
xtables-multi iptables -t nat -D UBIOS_POSTROUTING_USER_HOOK 1

Die Datei speichern und dann noch ausführbar machen:

# chmod +x disable_nat.sh

Nun kann man das z.B mal von Hand ausführen und kontrollieren:

# ./disable_nat.sh
# xtables-multi iptables -t nat -L UBIOS_POSTROUTING_USER_HOOK -v --line-number
 Chain UBIOS_POSTROUTING_USER_HOOK (1 references)
 num   pkts bytes target     prot opt in     out     source               destination         
 1        1   264 MASQUERADE  all  --  any    eth9    anywhere             anywhere             /* 00000001095216660482 */

Wie man sieht, ist nun nur noch die zweite Regel vorhanden resp. hat den Platz der ersten Regel eingenommen. Ab sofort ist NAT deaktiviert.

Hat man nur ein VLAN auf welchem man NAT deaktivieren will, kann man evtl. mit den in/out Interfaces spielen. Ich habe das nicht getestet.

Download Youtube content with youtube-dl


Example for OSX:

Make a new directory:

mkdir youtube-dl
cd youtube-dl

Install the python-tool youtube-dl:

sudo curl -L https://yt-dl.org/downloads/latest/youtube-dl -o youtube-dl

To convert audio to mp3, you need ffmpeg:

wget https://evermeet.cx/ffmpeg/ffmpeg-4.2.2.zip
unzip ffmpeg-4.2.2.zip

Create a bash script which saves audio to mp3, with this you don’t have to remember the parameters:

vi youtube-dl-mp3.sh

Content:

#!/bin/bash
./youtube-dl --ffmpeg-location ./ffmpeg -x --audio-format mp3 $1

Save it with :x! and make it executable:

chmod +x youtube-dl-mp3.sh

Now you can let the magic begin by executing this script and give the youtube shortcode as parameter:

./youtube-dl-mp3.sh dQw4w9WgXcQ
 dQw4w9WgXcQ: Downloading webpage
[download] Destination: Rick Astley - Never Gonna Give You Up (Video)-dQw4w9WgXcQ.webm
[download] 100% of 3.28MiB in 00:00
[ffmpeg] Destination: Rick Astley - Never Gonna Give You Up (Video)-dQw4w9WgXcQ.mp3
Deleting original file Rick Astley - Never Gonna Give You Up (Video)-dQw4w9WgXcQ.webm (pass -k to keep)

Now we have an mp3 called:
“Rick Astley – Never Gonna Give You Up (Video)-dQw4w9WgXcQ.mp3”

If you want the complete video, just start:

./youtube-dl dQw4w9WgXcQ

See also the thousands of other options with:

./youtube-dl --help

vCenter Server behind NAT

Be warned: This configuration is not officially supported by VMware.

If you have your vCenter Server behind NAT, you can not connect your ESXi Host to this Server. It will loose connection after a few seconds to vCenter because vCenter publishes his private IP to the configuration of ESXi.

1. We need an port forwarding of port TCP/UDP 902 from your public IP to the internal IP of the vCenter Server. If you have a Firewall, allow connections only from the IP of your ESXi host.

2. Connect over SSH to the ESXi Host and edit vpxa.cfg with vi:

vi /etc/vmware/vpxa/vpxa.cfg

Configure the following settings:

Insert this tag, if you don’t add this tag and restart the services, it will overwrite the IP again with the private one of vCenter:

<preserveServerIp>true</preserveServerIp>

Replace the private IP of the vCenter Server with the public one:

<serverIp>PublicIPvCenterServer</serverIp>

Restart services:

/etc/init.d/hostd restart

Now the connection should stay stable.