All posts by Stefan

mouSTer

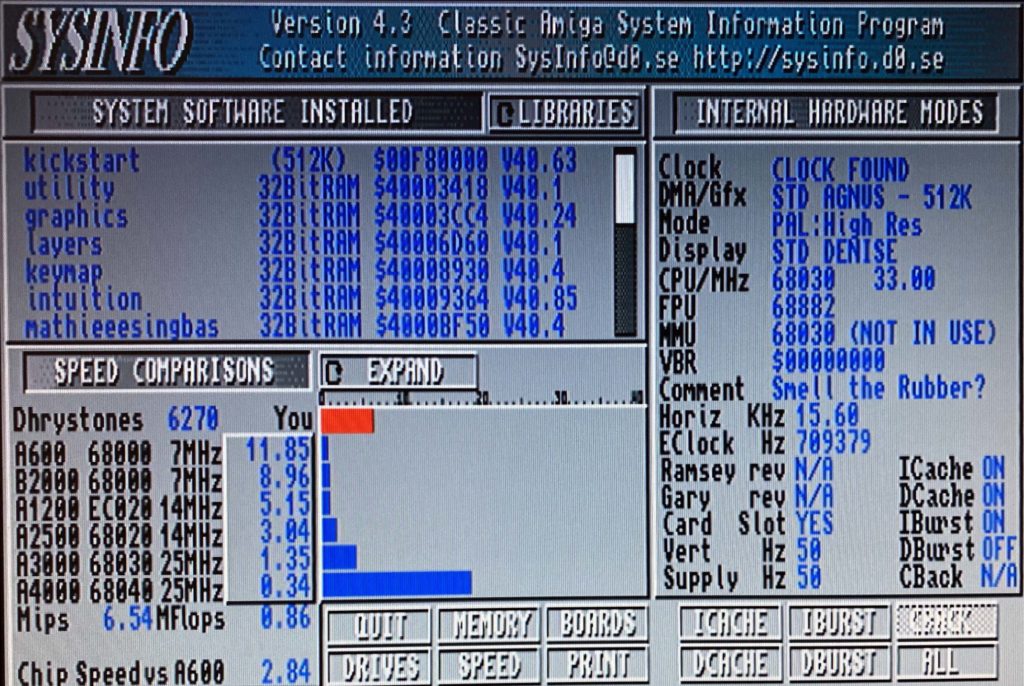
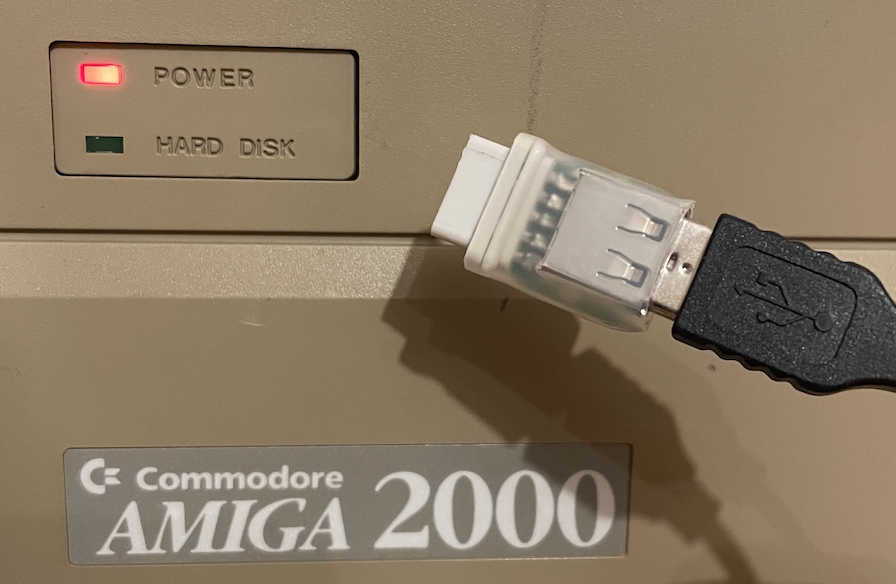
I tested mouSTer, the ultimative USB mouse adapter with my Amiga 2000.
The first firmware fw.3.08.1801 was not working. But less than a month later there were several new firmwares and with the latest fw.3.10.1939 it works perfectly.

mouSTer adapter with mouse cable plugged in

Settings I used:

type=01 ;(Amiga, default is 00 for Atari)
microstep=4 ;(10 is default, but mouse is then too slow) 

Tested Mouse-Devices: Logitech RX300 and M-UAE96, Chinese no brand mini optical mouse.
Costs with shipping: ~34€
Cheaper than a new old Amiga Mouse on any online market and you can even connect gamepads.

Firmware: http://jil.guru/mouSTer/
Blog Post: https://retrohax.net/project-mouster-the-ultimate-mouse-adapter-for-retrocomputers/

mouSTer documentation-part of the INI-File:

; ####################################################################
; #                                                                  #
; # Features:                                                        #
; # Emulates Atari, Amiga and Commodore 1351 mouse.                  #
; # Can handle up to 16 buttons that can be translated to any action*#
; # Can handle up to 6 axes, that can be translated to any action*   #
; #                                                                  #
; # More to come…                                                    #
; # *any action - means any joystick direction or fire/mouse button  #
; #                                                                  #
; ####################################################################
;
; ####################################################################
; # User Manual                                                      #
; ####################################################################
;
; #############################-BlinkCodes-###########################
;
; mouSTer is communicating with you using MORSE CODE or simply
; blinking the LED.
;
; List of possible messages:
;
; Very fast blinking: Bootloader is Active and is waiting for USB
; drive with new firmware.
; If USB drive is not detected within 2s, main program will be
; launched.
;
; Normal blinking: mouSTer is ready, and is awaiting USB HID device
; (mouse, game pad etc).
;
; HeartBeat: 2 fast blinks and long pause. mouSTer is alive and
; operational.
;
; SOS: <… --- …> Critical problem has occurred. Not possible to
; recover from this state. Please cycle power.
;
; E: <.> An error has occurred. Remove USB device | Check INI file
; syntax.
;
; R: <.-.> Operation successfully finished. Remove the USB device.
;
; ########################-Using-an-USB-Drive-#######################
;
; When USB drive is inserted, mouSTer is looking for a 'mouSTer'
; folder.
; If the folder does not exists, it will be created and opened.
; Then mouSTer is looking for configuration file: 'mouSTer.ini'
; If exists, configuration will be read and parsed then written to
; memory.
; If no ini file is present, mouSTer is looking for new firmware file:
; 'mouSTer.fw'.
; If firmware file is present mouSTer will activate the bootloader,
; and install new firmware.
; In case if no ini nor firmware present - mouSTer will write (this)
; ini file
; with manual and current firmware version on the top - into
; 'mouSTer.ini' file.
;
; mouSTer is case insensitive.
;
; mouSTer config   file: '/mouSTer/mouSTer.ini'
; mouSTer firmware file: '/mouSTer/mouSTer.fw'
;
; most up to date information and the latest firmware is always
; available at: http://Jil.guru/mouSTer

UDM-Pro mit public IP-Range

Die UniFi Dream Machine Pro von Ubiquiti ist an und für sich ein schönes Gerät, will man damit aber etwas professioneller unterwegs sein, zB mit einer public IP-Range ohne NAT, so wirkt die Firmware noch unausgereift und man muss derzeit noch zu Tricks greifen.

Folgend die Notizen wie man NAT deaktivieren kann, getestet mit Firmware 1.8.5.

VORSICHT: Nachdem NAT deaktiviert wurde, steht euer PC öffentlich im WAN! Tut folgendes nur wenn Ihr wisst was Ihr macht.

Als erstes erstellen wir ein VLAN mit der ersten public-IP die wir via PPPoE erhalten. Dies kann noch über das WEB-GUI gemacht werden. Nach Lust und Laune kann hier auch noch ein DHCP-Server eingerichtet werden.

Nun verbinden wir via SSH auf die UDM-Pro und starten eine Shell:

ssh root@<ip-adresse der UDM-Pro>
# unifi-os shell

Und laden ein Paket welches uns erlaubt, ein Script persistent zu speichern nach dem Reboot der UDM-Pro auszuführen (evtl. auf neue Version prüfen):

root@ubnt:/# curl -L https://raw.githubusercontent.com/boostchicken/udm-utilities/master/on-boot-script/packages/udm-boot_1.0.2_all.deb -o udm-boot_1.0.2_all.deb
root@ubnt:/# dpkg -i udm-boot_1.0.2_all.deb
root@ubnt:/# exit

Danch kontrollieren welches unsere Firewall-Regel ist welche NAT macht:

# xtables-multi iptables -t nat -L UBIOS_POSTROUTING_USER_HOOK -v --line-number
 Chain UBIOS_POSTROUTING_USER_HOOK (1 references)
 num   pkts bytes target     prot opt in     out     source               destination         
 1     1873  154K MASQUERADE  all  --  any    ppp0    anywhere             anywhere             /* 00000001095216660481 / 2        1   264 MASQUERADE  all  --  any    eth9    anywhere             anywhere             / 00000001095216660482 */

In meinem Fall ist es die erste Regel mit dem out-interface ppp0.
Diese müssen wir nun löschen mit einem Script, welches auch nach einem Reboot die NAT-Regel wieder entfernt. Zuerst erstellen wir das File:

cd /mnt/data/on_boot.d/
vi disable_nat.sh

Dann brauchen wir folgenden Inhalt der die Regel löscht. Falls es bei euch eine andere Regel-Nr. ist, einfach die Zahl am Ende anpassen. Bei mir ist es Regel Nr. 1:

#!/bin/sh
xtables-multi iptables -t nat -D UBIOS_POSTROUTING_USER_HOOK 1

Die Datei speichern und dann noch ausführbar machen:

# chmod +x disable_nat.sh

Nun kann man das z.B mal von Hand ausführen und kontrollieren:

# ./disable_nat.sh
# xtables-multi iptables -t nat -L UBIOS_POSTROUTING_USER_HOOK -v --line-number
 Chain UBIOS_POSTROUTING_USER_HOOK (1 references)
 num   pkts bytes target     prot opt in     out     source               destination         
 1        1   264 MASQUERADE  all  --  any    eth9    anywhere             anywhere             /* 00000001095216660482 */

Wie man sieht, ist nun nur noch die zweite Regel vorhanden resp. hat den Platz der ersten Regel eingenommen. Ab sofort ist NAT deaktiviert.

Hat man nur ein VLAN auf welchem man NAT deaktivieren will, kann man evtl. mit den in/out Interfaces spielen. Ich habe das nicht getestet.

Phoniebox

Ich habe unserer Tochter zu Weihnachten eine Phoniebox gebaut. Grundsätzlich findet man alle nötigen Informationen auf der Webseite der Phoniebox, ich beschreibe hier rudimentär die Schritte die ich gemacht habe und die verwendete Hardware. Die Front wurde gefräst, der Rahmen vom OLED-Display mit PLA gedruckt und die Symbole gelasert, alles mit dem Snapmaker 2.0 A350. Zusätzlich habe ich aus einer Schublade vom Dragan eine Aufbewahrungsbox für die RFID-Karten gemacht.

Hardwareliste:

Raspberry Pi 3 Model B Rev 1.2
SanDisk 32GB SD Card
Raspberry Pi 3 GPIO expansion board
LED-Arcade Buttons (nicht verwendet)
1.3″ 4-Pin I2C OLED 128X64 mit sh1106 Controller
125kHz RFID Karten
RFID Reader EM4100/Tk400 125kHz
USB Buchse
EARU On/Off Schalter
HifiBerry MiniAMP
Pimoroni OnOff SHIM
Speedlink Twoxo Speaker
Trust Urban Primo PowerBank 10’000mAh
Dragan von IKEA
Östernäs von IKEA
EC11 Rotary Encoder als Lautstärkeregler
TTP223 Touch Sensoren als Bedienelemente
Lichtwellenleiter

Continue reading Phoniebox

Amiga 2000 mit TerribleFire 534

Ich habe dem Amiga eine TerribleFire 534 gegönnt. Damit hat er statt den originalen 7 MHz nun 33 MHz und zusätzliche 4MB FastRAM. Zusätzlich habe ich noch von HDD auf CF-Karte gewechselt. Nun läuft alles ein bisschen runder und Programme die vorher nicht von der CF-Karte gestartet werden konnten wegen zu wenig RAM, laufen nun problemlos.

Die TerribleFire wird auf das A2000 Relocator-Board gesetzt, dieses wird dann in den CPU-Slot auf dem Mainboard gesteckt. Die Original-CPU wird dabei vom Sockel entfernt.

TerribleFire 534 with A2000 relocator board

Hier der Speedtest mit SYSINFO im Originalzustand. Wir sind bei 0.74 MFlops, dies entspricht genau dem A2000.

SYSINFO without TerribleFire

Hier der Speedtest mit der TerribleFire, wir sind nun bei 6.54 MFlops. Auch hat die CPU nun eine MMU und FPU welche u.A. auch für WHDLoad benötigt werden. In der heutigen Zeit sind diese Zahlen ein Witz, aber für den Amiga sind das Welten 🙂

SYSINFO with TerribleFire

Es gibt die TerribleFire auch noch mit 40MHz und 50MHz, die waren mir aber zu teuer. Ausserdem hatte ich die Befürchtung dass einige Anwendungen damit nicht mehr klar kommen könnten.

OSX: Don’t ask always for ssh passphrase

Copy your private key to ~/.ssh/

chmod a-r id_rsa
chmod u+r id_rsa


Permissions should read:

.ssh directory: 700 (drwx------)
public key (.pub file): 644 (-rw-r--r--)
private key ( id_rsa ): 600 (-rw-------)

To save the passphrase in the keychain type:

ssh-add -K ~/.ssh/id_rsa

Enter your passphrase.

To tell the ssh agent to use your key from the keychain, create the file ~/.ssh/config and put this in it:

Host *
 UseKeychain yes
 AddKeysToAgent yes
 IdentityFile ~/.ssh/your_id_rsa
 IdentityFile ~/.ssh/your_id_rsa2 (if you have multiple)